Showing posts with label Recipe. Show all posts

Tuesday, April 5, 2011

Strawberry Fruit Tart (EASY)

I have stopped baking for quite many months since the "side effects" of pregnancy hits me. I've been getting tired easily and nonetheless I sweat like a Polar bear out of ice cold water. Hot humid weathers or enclosed area seems to give me a headache and blocked nose too~

Anyway, back to the recipe, I bought a can of Strawberry Filling "long long" time ago (which also cost me RM12++ coz its imported from U.K.) so I thought I should make good use of it before its expiry date. I ended up doing mini fruit tarts with the Strawberry fillings.

I used the same Hong Kong Egg Tarts pastry crust recipe that I've shared earlier, so I won't be re-writing it here. I've searched for various types of crusts recipe on the web and I found that this egg tart crust is the easiest, simplest and yet delicious to eat! It is a 99% non failure crust recipe. However, I did alter the ingredients a bit, using more flour (80gm) and an additional 1tsp of beaten egg.

So, after baking the empty crust according to its directions (remember to sting holes on the unbaked crust and put bean weights on the crust while baking to prevent the crust from rising), I let it cooled.

When the crust has cooled, melt some chocolate (dark/milk/white) in a small bowl (i use 5 small squares of cooking chocolate), and using a small pastry brush, brush an even layer of melted chocolate on the insides of the crusts. ( This will prevent the fillings from making the crusts soggy).

Chill till ready to use.

Pour strawberry fillings into the prepared crusts. Spread evenly. You can use any kinds of fruits fillings you like. You can even substitute it with fresh or canned fruits and glazed the top with some gelatine or unflavoured jelly.

Fridge till ready to serve.

Easy Peasy... and you have a mouth-watering sweet desserts to impress. =D

Thursday, September 30, 2010

This is another healthier options for muffin lovers. It is easy to make, adopting the basic method in making muffins, which is to mix wet ingredients into the dry ingredients. All you need is clean bowls, a spatula or spoon and a kitchen scale.

The muffins are really moist, smell great of walnuts and the insides are fruity with the sultanas. If you don't like walnuts in your muffins, you can substitute it with sunflower seeds. You might also want to substitute sultanas with raisins or any other types of dried berries. It is so versatile yet yummy to bite.

My hubby found that it is still moist and tastes as good the next morning. He enjoyed 3 muffins for his breakfast with a cup of hot milo.

I made 16 muffins instead of the usual 12 cause I had used slightly smaller muffin cups.

I don't usually use expensive muffin cups as its rather a waste of money, but when I went to the bakery ingredients shop the other day, I couldn't resist buying these cute-sy muffin cups. I guess, it is alright to spoil yourself sometimes, right??? =P


Sultanas & Walnuts Muffins

Ingredients
140g plain flour
1 tbsp baking powder
115g soft light brown sugar ( I use 50g castor sugar + 50g dark brown sugar)
140g porridge oats ( I use Quaker Quick Cook Oat)
100g sultanas
100g crushed walnuts
2 eggs
250 ml skimmed milk
6 tbsp sunflower oil
1 tsp vanilla extract

Method
1) Preheat oven to 200degree C/400degree F/Gas Mark 6. Line 12-hole muffin tin with 12 paper cases. (I wanted a prettier effect so I used muffin cups with designs on it) =)

2) Sift together flour and baking powder into a large bowl. Stir in sugar, oats, sultanas and 60g  of the crushed walnuts.

3) Place the eggs in another large bowl and beat lightly, then beat in milk, oil and vanilla extract.

4) Make a well in the centre of the dry ingredients and pour in the beaten liquid ingredients. Stir gently until just combined; do not overmix.

5) Spoon mixture into paper cases. Sprinkle the remaining crushed walnuts over the tops of the muffins.

6) Bake in the preheated oven for 20 minutes or until well risen, golden brown. (My oven takes 17 minutes only)

7) Leave to cool in the tin for 5 minutes, then serve warm or transfer t a wire rack to coo completely.

Tuesday, September 7, 2010

Quad-C (Choc Chips & Cinnamon Cookies)

My hubby bought me a set of baking books that is published by "LOVE FOOD" Parragon Books Ltd. The books are full of beautiful pictures and the recipes are mainly easy to follow. I can't wait to try out the new recipes I found in these books.

The very first recipe that I tried is the Chocolate Chip & Cinnamon Cookies (Quad-C). These are simple to make and is perfect with a cup of herbal tea. The light coating of cinnamon also gives additional flavor to the cookies. 
However, I have a huge problem with the settings of my oven. Again, I have to reduce the temperature and the baking time. The first badge of Quad-C I made brown too fast and the edges are burnt.

So, if you are using a small oven like mine, you might like to adjust the temperature and time accordingly. This cookies also stored well in an air-tight container.

Recipe for Quad-C Cookies
makes about 35 medium sized cookies

Ingredients
- 225g/8 0z butter, softened at room temperature
- 140g/ 5 0z castor sugar
- 1 egg yolk, lightly beaten
- 2 tsp orange extract
- 280g / 10 oz plain flour
- pinch of salt
- 100gm / 31/2 oz plain chocolate chips (I just use a handful)


Method
1) Preheat oven to 190degree C/ 375F / Gas Mark 5. Line 2 large baking sheets with baking paper. (I have to reduce the temperature to 170degree C in my oven)

2) Place the butter and sugar in a large bowl and beat together until light and fluffy.

3) Then beat in the egg yolk and orange extract.

4) Sift together flour and salt into the mixture, add chocolate chips and stir until thoroughly combined.

5) To make cinnamon coating, mix the sugar  and cinnamon together in a shallow dish or plate. 

6) Scoop out tablespoons of the cookie dough, roll them into balls, then roll them in the cinnamon mixture to cat. Place them on the baking sheets, spaced well apart. (The cookie will expand when bake)

7) Bake in the preheated oven for 12-15minutes or until golden brown. ( I reduce the baking time to 10 minutes)

8) Leave to cool on the baking sheets for 5-10 minutes, then transfer the cookies to wire racks to cool completely before storing.

** To make White chocolate & spice Cookies, simply replace the plain chocolate chips with 100gm/ 31/2 oz white chocolate chips and replace the cinnamon with 1 tbsp of ground mixed spice and 1/2 tsp of ground nutmeg.

*Photos credited to my lovely hubby, Stanley*

Honeyed Cornflakes Cups


This is a very easy recipe to follow and is even more delicious to eat. It makes a lovely gift for friends and relatives on festive times as it does not cost too much and most important it is a 100% failure proof recipe.

The few things that you need to start making your own "honeyed cornflakes cups" is a big heat-proof bowl (I use a stainless bowl), a medium sauce pan, a teaspoon, a whisk, a rubber spatula, mini paper cups (or you can use regular paper cups), an oven and baking trays.

As I am making the "mini" version of these honeyed cornflakes cups, the most time consuming part is filling the honey coated cornflakes into the mini paper cups. Filling too little and it looks empty, filling in too much and it will spill when baked. Despite the trouble, I had no regrets going mini because it doesn't only look beautifully cute but it is a one-bite temptations.

Okay, enough of mumbling and here's the recipe. I hope you will try it out because it is really easy to make even with kids around.

Recipe for Honeyed Cornflakes Cups
makes 100+ mini cups or about 50 regular cups


Ingredients
- 5 cups cornflakes (lightly crushed with a rolling pin or clean dry hands)
- 120g unsalted butter
- 1/2 cup caster sugar
- 3 tbsp honey ( I reduce to 1 tbsp + 1 tsp vanilla essence)
- crushed nuts (optional)
- sprinkles ( I use hundreds and thousands)
- adequate amount of baking paper cups


Method
1) In a large saucepan, combine and melt butter, sugar and honey on slow fire. (becareful not to burn the butter and sugar). Stir with a whisk.

2) Turn off flame, immediately add cornflakes and nuts (if using).

3) Stir to coat the cornflakes evenly in the butter sugar mixture. (Sugar mixture will thicken when cool, so you must stir while it is still hot)

4) Place cups and spoon a tablespoon of mixture into cups. (This is the tricky part if you are using mini paper cups, I recommend using a teaspoon)

5) Bake in a pre-heated oven for 10 minutes at 350 degree F or 175 degree C. (I reduce the baking time to 7 minutes in my oven)


6) Remove from oven. Leave on the baking tray for a few minutes. Transfer to a wire cooling rack and cool completely before storing.

Sunday, August 29, 2010

Melting Moments


Oh My! Oh My! Oh My!! It has been quite a while since I last wrote on my blog. Been busy baking for a charity sales that will be held on 31st August, this coming Tuesday. Well, my friends and I had decided to open up a stall selling a variety of bakery items. I called up to several friends and kind people asking for donations of all sorts. And guess what, there are still Unconditional Love in this world =) Love does exist after all ! ~_~

Just few days after my first attempt of cold calls and cold emails, I got good news. A friend of mine are baking hot dog buns and cream buns for us to sell. A bakery shop are going to donate all freshly baked items that are still on the shelves at the end of Monday evening, 30th August. Relatives donate monies, shops gave special discounted prices for ingredients and containers. A cousin are baking his delicious home made pizzas for sell. There are all kinds of help that we happily received. Words of encouragements are showered onto us =)

Now, let's review what we had gathered at last. I love to call it "Project 318". All in all, we had successfully gathered 4 pizzas (32slices),  20 bags of mini hot dog buns, 30 cream buns, 96 banana muffins, around 50 packets of pudding and Konyaku Jellies, 19 containers of Melting Moments, 16 containers of Kellogg's Honeyed Cornflakes cup, Cordial Drinks and more buns, cakes and muffins from the bakery shop.

I choose to bake Melting Moments for this fund raising as it is fairly easy to prepare and require simple ingredients. The main problem I faced is the timing it takes to bake in my oven. The original recipe from Happy Home Baking and Joy Of Baking web asks for 12 minutes, but it burnt in my little oven, so I have to reduce it to 8-10 minutes for the perfect Melting Moments.

If you are a Malaysian, Melting Moments' texture is similar to Kuih Momo, but this is more buttery and the sweetness depends largely from the dusting of icing sugar on the top.

Ok, enough of my mumbling (= Let me share with you the recipe I had taken from both website. I followed the recipe to the tip but I substituted unsalted butter and the baking time.

Oh, and another lovely thing about these Melting Moments is that it stored well for up to 2 weeks. I'm going to bake it again for the upcoming festive seasons! It's definitely the PERFECT giveaways for family and friends =)

Recipe for Melting Moments
 Ingredients:
A 
( Put the ingredient in a mixing bowl. Using a hand mixer, cream the ingredients till pale and fluffy. Then, add vanilla essence and beat for another few seconds.)
- 175g unsalted butter, room temperature (I use salted Golden Churn butter)
- 40g icing sugar
-1/2 tsp vanilla essence

B  
(Sift flour together into a dry and clean bowl. Set aside.)
-175g plain flour
-40g corn flour

-extra icing sugar for dusting

Method:
1) Sift B over the butter mixture. ( I found that by double sifting, the dough appear smoother)
2) Gently mix the flour and butter mixture with a silicon spatula. (This prevents the flour from flying when being mix later)
3) With a hand mixer, mix the flour and butter mixture till smooth.
4) Scrap down all the dough from the mixer and sides of the bowl.
5) Cover with a cling wrap and fridge the dough till firm. (about 1 hr)
6) Preheat oven at 180degree C for 10minutes.
7) With a teaspoon, spoon mixture into a ball. ( For fancy melting moments, you can pipe it into shapes).
8) Line baking tray with parchment paper.
9) Space each ball well apart so it does not stick when bake.
10) Bake for 12 minutes or until pale golden color. (My oven takes 8 minutes)
11) Leave the baked melting moments on tray for a few minutes to firm up before transforming to wire rack to cool.
12) When cooled, sprinkle icing sugar on top. ( I use a small sifter).
* Store in airtight containers and can be kept for 2 weeks. Melting moments are fragile, so please handle them gently.*

Wednesday, August 18, 2010

Vegetable Chicken Thai Green Curry


There are some days when I couldn't think of Chinese home-cooked dishes to prepare for my family. Cooking lunch and dinner daily really makes me run out of recipes fast!~

It's also difficult to cook dishes that suits everybody in the house, taking into an account of the dishes' level of cholesterol, amount of salt, sugar and seasonings used, spiciness and most importantly its taste to accompany with a plate of hot steamed rice.

I always complain to my hubby, the first and last thing a housewife (that cooks) thinks about everyday is "What shall I Cook today?" This question is stuck in my brain since the day I resigned from my full-time job and begin my housewife journey.

Anyway, I went to the market this morning and bought loads of vegetables. Today's special recipe is going to be vegetable and chicken Thai-style green curry. In addition, I also fried some fish fillets and stir-fry 2 plates of green vegetables.

I compiled a few different Thai Green Curry recipes to produce MY version of Thai style Green Curry. You can alter and add almost any kind of vegetables you like. The important thing is to stir fry the curry paste with some brown sugar till fragrant before putting in vegetables.

I hope you will try it at home and enjoy it with a plate of hot steamed rice! (^_^)

Ingredients
A
2 tbsp vegetable oil
1 clove garlic (minced)
1 red chili (remove seeds, sliced thinly)
3 tbsp of Thai Curry Paste (any brand will do)
1 tbsp light brown sugar (or raw sugar)
2 stalk of lemongrass (smashed fat ends with a rolling pin)

B
200 ml  coconut milk
1 1/2 cup vegetable stock
1 tbsp fish sauce or light soy sauce
3 lime leaves (washed and cut thinly)
a bunch of chopped coriander

C (You can substitute the ingredients below to your preferences)
1 boneless chicken thigh (washed,trimmed away fats and cut into small cubes)
1 stalk of broccoli (cut into florets, trim the edible stalks)
3 medium sized potatoes
2 carrots
1 block of firm bean curd (cut into small squares)
1 brinjal (cut into rectangular shapes)
a handful of sweet beans
a handful of baby corn (split into half)
half bell pepper/capsicum (cut into smaller squares)
some pumpkins (cut into small squares)
(you can even use sweet potatoes, long beans, bean sprouts, cauliflower....)

Method:
1) Marinate chicken cubes with a dash of fish sauce or light soy sauce and pepper powder.

2) Bring the potatoes, carrots and broccoli to a boil. Add some salt and a teaspoon of vegetable oil. Drain the vegetables. Reserve 1 cup of vegetable stock for later use.

3) Heat a non-stick pan. Pour in the oil and sauté ingredients A till fragrant. Stir the ingredients with the lemongrass stalks.

3) Add in the chicken cubes. Make sure the chicken cubes are coated with the sauté ingredients. Then, add in the raw vegetables that you are using. Continue to stir fry for 3 minutes.

4) Pour in coconut milk. Keep stirring to prevent lumps. Bring to a gentle boil.

5) Add in the remaining precooked vegetables and beancurd. Gently mix the vegetables into the sauce. Then, add in vegetable stock, fish sauce and lime leaves.

6) Cover with a lid, turn to low heat and let it simmer for 10 minutes (or till the sauce thickened slightly). Season with salt to taste. Garnish with generous amount of chopped coriander.

7) Serve immediately with a plate of hot fragrant steamed rice. Enjoy!~

Friday, August 13, 2010

Chocoholic Brownies


On some days, I have strong urge to have something sweet, something chocolate-y~ So, I baked this Chocolate Chip Brownies yesterday for a feel-good-but-sinful-to-the-body treats! (^_^)

I've just alter a tiny bit of the original recipe. It is simple to make, easy, and does not require any butter. However, I strongly recommend to line the base of the greased pan with wax or parchment paper for easier removal.

Chocoholic Brownies
Makes : 16 squares

Ingredients:
150g semisweet chocolate, chopped and at room temperature
1 tbsp milk
120ml sunflower oil ( I used Canola Oil)
215g light brown sugar (I substituted with 100g brown sugar + 70g castor sugar)
2 large eggs
5 ml vanilla essence
65g self-raising flour
4 tbsp cocoa powder
4 tbsp milk chocolate chips

Method:
1) Preheat oven to 180degree C. Lightly grease a 19cm/8inch square pan. Lined with parchment paper.

2) Pour in the milk and melt chocolate by double boiling. (Melt chopped chocolate in a pan above a pot of simmering boiling water.) Use a spatula to stir the melting chocolate.

3) Combine oil, sugar, eggs and vanilla essence in the mixer bowl. Beat till combined with an electric mixer.

4) Stir in melted chocolate. Beat till evenly mixed.

5) Sift flour and cocoa powder into batter.

6) With a spatula, fold in flour mixture until it incorporates into the batter.

7) Stir in chocolate chips. Mix well.

8) Pour mixture into the prepared square pan. Spread mixture evenly to the edges. (Mixture should be sticky and gooey)

9) Bake for 30-35 minutes till top is firm and crusty. Cool completely in pan before cutting into smaller squares.


Saturday, August 7, 2010

Butter Pound Cake

Since I was into baking lately, I decided to store up both salted & unsalted butter. Last few days, I baked a Butter Pound Cake and I was really delighted with the results. The cake is very fluffy, lighter than the normal butter cake version and is really good with a cup of hot Milo.

The recipe calls for cake flour, but I just substituted with all-pupose flour (plain flour). The trick to make a good butter pound cake is to make sure all ingredients are at room temperature. Leave the butter outside for at least an hour to achieve room temperature. Butter should be soft when touched with a finger. 

Some baker suggests making a well in the middle of the batter before baking to prevent a 'hill shaped cake' and to prevent the cake from breaking too much when baked.

Recipe for Butter Pound Cake:
(makes 1 loaf) (23cmx13cmx8cm)
Preheat oven 177degree C or 350degree F.
Butter a non stick loaf pan and lined bottom with parchment paper.

Ingredients:
- 3 large eggs
- 3 tbsp milk
- 1 1/2 tsp vanilla extract
-11/2 cup (150gm) sifted cake flour
- 1 tsp baking powder
- 1/4 tsp salt
- 3/4 cup (150gm) castor sugar
- 13 tbsp (185gm) unsalted butter

Method:
1) Combine eggs, milk and vanilla extract in a medium bowl. Whisk lightly.
2) Combine flour, baking powder,salt and sugar into another bowl for mixer.
3) Mix on low speed (30 sec) to blend in dry ingredients.
4) Add butter and half of the egg mixture.
5) Mix on low speed till dry ingredients are moistened.
6) Increase to medium  speed, beat for 1 minute to aerate and develop cake texture.
7) Scrape down sides of bowl. Gradually add remaining egg mixure in 2 badges, beating 30 sec after each addition to incorporate egg.
8) Scrape batter into pan. Smooth top with spatula.
9) Bake for 55minutes or till golden brown and inserted toothpick comes out clean.
10) If the top browns too much, cover with a buttered aluminium foil after 30 minutes.
11) Let cool in pan. Remove and serve when cool completely.

Tuesday, July 20, 2010

Simple Baked Lemon Cheese Tarts


These are really simple to make and it serves as a good dessert after meal. It has a ligther texture and has a refreshing lemon-y taste to it! It is best served after chilled in the fridge for at least 2 hours.

The recipe uses the same dough as the Hong Kong egg tarts. So, please visit my previous blog for the pastry recipe.

Ok, the fun part here~ With the amount of lemon cheese fillings I made, I was able to make 6 mini + 6 normal size cheese tarts. Please forgive me if there's any confusion, but I only have these amount of tart shells in my kitchen =P

Lemon Cheese Fillings
80gm cream cheese at room temperature ( I use Philadelphia)
60g Castor sugar
1 lemon juice
1 large egg (plus remaining egg from pastry dough)
1 tbsp grated lemon zest
*optional: 1 tbsp of cream*

Method:
1) In a food processor, place cream cheese. Process till smooth.
2) Add sugar. Process till incorporated.
3) Add in egg. Scrape down any fillings stuch to the sides. Process till thoroughly combined.
4) Add in lemon juice and zest. Process till well blended and smooth.
5) Use a fine strainer to remove any foams. Pour filling into tart shells.
6) Bake at pre-heated oven 220degree C for 20 minutes till fillings are just nicely set.
7) Cool. Cover and Fridge.

Saturday, July 17, 2010

Hong Kong Egg Tarts


Egg tarts have always been my most favorite sweet dim sum since young. Whenever I go for dim sum at cafe or bakery, I'll get as much as I can 'filled' in my tummy!!~

However, recent years, I found that the local bakery here has increase their selling price from RM1 to RM1.20 - RM1.50!!! this is a ridiculous price!! Some even have a much thicker skin and less egg filling!! Some I found is too sweet and too buttery!!

So, one day I decided to search for original flavor egg tarts recipe and I found this easy and trusted recipe from youtube, a lady called wantanmien demonstrate step by step on how to make these delicious Hong Kong dim sum egg tarts. You can look at it at http://www.youtube.com/watch?v=KxTNQFcAkZY.

This recipe is so good because the steps are straightforward and so easy to make. The basic tools you need is tart shells or a muffin pan, a fork and spoon. I also like it cause it doesn't use any lard or shortening as well as no yellow coloring! So it is really healthy to eat!!

I baked 6 mini egg tarts and 6 normal size egg tarts and it is gone within 2 hours!!! = ) I also used the same pastry recipe to make lemon cheese tarts and it turns out yummy-licious too!! And all these just costs me less than RM5!!

Recipe for Mini Hong Kong style Egg Tarts:
(makes: 20 mini egg tarts)
Pastry
65gm sieved flour
18gm(31/2tsp) icing sugar
35gm butter,cut into smaller pieces at room temperature
1 beaten egg

Method:
1) Put all ingredients except egg (just put 2 tbsp first) into a clean bowl.
2) Using hand, knead into a smooth dough, if the dough is dry add some more beaten egg.
3) Using a cling wrap, Cover the dough in fridge for 30 minutes (if in cooler country, fridge for 15 minutes).
-----------------------------------------------------------------------------------------------------------
Egg Tart Fillings
50 ml warm water
40 gm (8tsp) icing sugar
50 ml milk
1 egg

Method:
1) Put icing sugar into warm water. Stir and let cool.
2) Add in milk, egg and remaining egg from the pastry.
3) Use a hand whisk to beat till combined.
4) Using a tea strainer, Sieve egg mixture into a cup to get rid of any foam.
------------------------------------------------------------------------------------------------------------
Method to assemble the Egg Tarts:
* Preheat oven 160 degree cC for 10 minutees. Middle stage.
1) Take out dough from fridge. On a work table, put some flour to make rolling easier.
2) Roll dough and divide to 2.
3) Roll into a sausage shape. Cut and divide into 10 small sections. Repeat for the other dough.
4) Roll into a ball.
5) Brush some melted butter on mould. Place dough in the centre of tart shell.
6) Using 2 thumbs, press evenly and till thin. Remove any excess dough.
7) Sting holes with fork.
8) Pour egg fillings to about 80% full. Repeat. Put filled tart shells in a larger pan for easier handling.
9) Place in the oven and bake for 20 minutes.
**Do not let the egg fillings to boil or pop up (else, the egg tarts will be wrinkly when cooled). Just bake the egg filings till nicely set. (If unsure, at 15 minutes take out the egg tarts and give it a gentle shake. If it is not wobbly it is done.)** 


Wednesday, July 7, 2010

Naughty Mini Chocolate Cupcakes


If you have read my previous blog, I made extra buttercream frosting and had stored it in the fridge. Since I do not want the frosting ended up in the dustbin, today I make another badge of mini cupcakes. The recipe was collected from the same website.

I found these chocolate cupcakes a bit too sweet, so next time instead of using 1 cup sugar which the original recipe called for, I will use 2/3 cup. The texture is very fluffy and moist. It is just lovely for a one-bite naughty snacks =)


Ok, now for the recipe:

Ingredients:

A (Stir and let cool. Set aside.)
1/2 cup cocoa powder
1 cup boiling hot water

B (Sift in a medium bowl.)
(175gm) 1 1/3 cup flour
2 tsp baking powder
1/2 tsp salt

C
(113gm) 1/2 cup unsalted butter, room temperature
1 cup castor sugar ( I would reduce it to 2/3 cup)
2 large eggs
2 tsp vanilla essence

Method:
1)** Please follow method (No.1 - 3) on the vanilla cupcakes recipe.
2) Now, add in flour mixture. Beat till incorporated.
3) Add cool cocoa mixture. Stir till smooth.
4) Evenly fill muffin pans.
5) Bake for 15-20 minutes. Remove & cool on wire rack.
6) Cool completely before frosting.

My Birthday

First of all, a Big Hug for myself & a Happy Happy Birthday to me =D

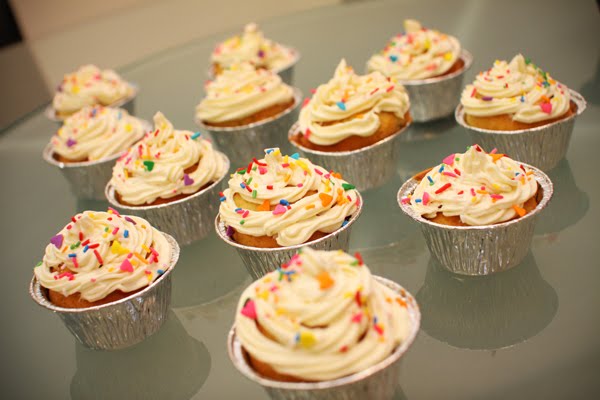
This year's birthday was a really special day for me because I made myself 12 birthday vanilla cupcakes with icing & decorations on them. Though I made quite a mess piping the buttercream frosting, I really had great fun doing it. I was so PROUD of myself.

Sometimes, the best present is not from others but from self so we should start giving ourselves little pressies from time to time (wink**). I am sure this little action will make life more satisfying and happy.

Now, a glimpse of the cutie cupcakes that I made =P


Well, not bad huh!~ he he, given that this is the first time I dealt with piping icing on cakes, I tend to pipe too much on one side. Another problem I faced is that I didn't cut off the dome of my cupcakes so it looks a bit pointy and less neat. I just don't want it to go to waste, so why trim it off =P

The original recipe is collected from JoyOfBaking's blog. However, I'll also share the recipe here. I just made small changes to the recipe. These cupcakes can be kept in an airtight container in the fridge for up to 4 days. Since the cupcakes itself is not too sweet, the butter icing goes really nice with the cupcakes.


The amount of batter can make 12 cupcakes & about 18 mini cupcakes. Here's the mini cupcakes version.


Recipe for Vanilla Cupcakes:

A (sift dry ingredients in a medium bowl)
(195gm) 1 1/2 cup flour
1 1/2 tsp baking powder
1/4 tsp salt

B
(113gm) 1/2 cup unsalted butter, room temperature
(130gm) 2/3 cup castor sugar
3 large eggs
1 tsp vanilla essence (I use 1 1/2 tsp)
1 zest of a lemon (optional, I omitted this in my cupcakes)
(60ml) 1/4 cup milk

Method:
1) Preheat oven to 350degreeF (177degreeC). Line 12 muffin cups or grease muffin pans.
2) In a bowl, use an electric mixer or hand mixer to beat butter & sugar till light & fluffy.
3) Add eggs, one at a time, beating well after each addition. Beat in vanilla essence.
4) Mixer on low speed, alternately add in half flour mixture followed by milk then end with the remaining flour mixture. Beat till well blended. Scrape down sides of bowl if needed. Do not overbeat.
5) Evenly fill batter in muffin cups(about 2/3 full). Do not waste the remaining batter, you can bake some mini cupcakes with it.
6) Bake for 15-20 minutes. Test with a toothpick.
7) Remove & cool on a wire rack. Cool completely then frost with icing.

** If you want flat topped cupcakes, sliced off the dome of each cupcake with a sharp knife before frosting**

Buttercream Frosting:

Ingredients
(230gm) 2 cups icing sugar (sifted)
(113gm) 1/2 cup unsalted butter, room temperature
1 tsp pure vanilla essence
2 tbsp milk (I use 1 tbsp milk +  1 tbsp all purpose cream)
Food color (if desired)

Method
1) With a hand mixer, cream butter till smooth & well blended. Add in vanilla essence.
2) Mixer on low speed, gradually beat in sugar.
3) Scrape down sides of bowl.
4) Add in milk & beat on high speed till frosting is light & fluffy (about 3-4min).
5) Add in a little more milk if needed.
6) Add in food color if desired.

** I made this amount of icing and in total I used it for frosting 13 cupcakes & 100 mini cupcakes. The remaining buttercream frosting can be stored in an airtight container for up to 3 days. Beat till stiff peaks form before using.**

Tuesday, June 29, 2010

YL's Choc Chips Banana Muffins


I bought some bananas from the local market yesterday and was craving for banana choc muffins~ So, after hubby & I came back from supper in KFC, I made these "smell-like-heaven" muffins.... yummmy!!!!

These muffins taste great for breakfast & tea time. It is moist and the sweetness is just nice~ from the bananas itself & the choc chips.

Ingredients for Choc Chips Banana Muffins:
Preparation time: 10 minutes
Makes 12

2 cups flour
1 1/2 tsp baking powder
1/2 cup brown sugar (you may reduce to 1/3 cup if you are using very ripe bananas)
1 cup mashed ripe bananas (2 large or 5 small) mash bananas with a fork
1 tsp vanilla essence
1 egg
1/2 cup butter, melted
1/3 cup milk
1/4 cup choc chips

Method:
1) Preheat oven at 180degreeC (350F). Place muffin cups or grease muffin pans with some melted butter.
2) Sift flour and baking powder in a big bowl.
3) Mix sugar, bananas, egg, butter, vanilla essence & milk to a medium bowl. Mix well.
4)Make a well in the centre of the dry ingredients and pour in banana mixture. Stir till well combined. Add in choc chips. Do not overmix.
5) Spoon batter into muffin pans (fill about 3/4).
6) Bake for 20-25 minutes. Test with a skewer.
7) Remove from oven. Let muffins cool on rack.
8) Once cool, remove muffins from pan.
7) Serve =)

Monday, June 28, 2010

Apple Raisin Cake


This cake was super moist & incredibly easy to make. It was so good that the cake was gone the next day. It's great for a cup of cuppa or tea. You can also substitute the apples to other fruits such as bananas.

Since I still have some sliced apples left in my fridge (which I had soaked it in cinnamon powder & sugar), I decided to bake an Apple Cake for hubby & I to munch on when we watched the WorldCup match (Germany Vs England). Hubby was a great fan of England. The cake cheered him up when England lost the WorldCup match to the Germany team.

Well, as I was rushing to prepare this cake, I forgot to take more pictures to show you by steps how I make this cake. Anyway, if you wanted the original  recipe, please go to http://simplyrecipes.com/recipes/apple_coffee_cake/ 

And here is MY version of Apple Raisin Cake:

Ingredients:

A (combined in a medium bowl)
1 Red Apple (thinly sliced & peeled) 
1 tsp cinammon powder
3 tbsp castor sugar

B (sift together & set aside)
1 1/2 cup flour
1 1/2 tsp baking powder

C
1/3 cup brown sugar
2 tbsp apple cinammon juice (from A)
 8 tbsp salted butter, room temperature
1 egg

D (mix in a bowl & set aside)
1/2 cup skimmed milk
1/4 Nestle all purpose cream

Method:
1) Preheat oven to 375degreeF or 190degreeC. Grease the sides & lined the base of a 9 inch square pan.
2) In a mixing bowl, cream butter & sugar with an electric mixer. Then beat in the egg. Beat till well blended.
3) Add flour mixture in 3 badges alternating with milk mixture. Beat until just combined.
4) Spread half the batter in the pan. Lay apple slices (as I wanted my cake to be very fruity, I also add generous amount of baking raisins). It's ok to overlap some of the apple slices.
5) Spread the rest of the batter. Smooth & sprinkle some brown sugar on top.
6) Bake cake for 25 minutes or until it is golden brown & when a skewer inserted comes out clean.
7) Cool in pan before turning it out.


Thursday, June 24, 2010

Yummy Baked Apple Cheesecake


This is the easiest baked cheesecake ever!! and It's really yummy!!

This baked cheesecake recipe was given by my Japanese friend. When we visited her in Japan, Osaka last April, we were invited to stay at her house for a night. We were showered with warmth and home made okonomiyaki. The dinner is just so tasty! Then for dessert, her father took out his version of baked cheesecake. My husband & I were so busy eating we forgot our manners! (>.<) They even left us 2 slices for our breakfast the next day.

Here's a photo of us with our friend & her family~ That's her father cutting his cheesecake for us!
YUMMY YUM YUM!!


Yesterday, when I wanted to bake this cheesecake, I found that I have a lot apples in my fridge. So, i decided to add some sliced apples on top of my cheesecake.

The whole process takes me less than 20 minutes to do. While the cake is busily baking in the oven, I enjoyed dinner with my family ~

Recipe for Baked Cheesecake:

Ingredients
200g cream cheese
200ml fresh cream (I use all purpose cream by Nestle at room temperature)
70g sugar
3 tbsp plain flour
3 eggs
1/2 lemon juice from fresh lemon

Method:
1) Preheat oven at 160 degree celcius.
2) Put all ingredients into a blender. Mix for 1 minute.
3) Pour batter into a 18cm (7in) cake pan. ( I use a 9in cake pan, so the end result is not as nice)
4) Bake for 50 minutes.
5) Cool in pan. (The cheesecake will shrink a little bit, so don't worry its normal!)
6) Serve.
Fridged remaining cheesecake.

For Apple Topping:
In a small bowl, stir together
2 thinly peeled, cored & thinly sliced apples ( I use SA Fuji Red Apple)
1/4 cup sugar
1/2 tsp cinammon powder
**Spoon mixture over the cream cheese batter. Sprinkle some brown sugar on top.**

Enjoy!~

Monday, June 21, 2010

Cute Bear Biscuits


I was still upset today of my uncle's loss. My tears are dry & it stained my heart. I need something to help me cope with this grieving process.

So, I ended up baking. I felt that by baking, it helps me to calm myself as I channel my thoughts and attention to something else. I felt a sense of control when I'm making something out of just flour, butter and stuffs. From plain flour to a cute product... Just watching how it blooms inside the oven & the smell is as good as aromatherapy itself.

Here's another great recipe originally found from http://pengskitchen.blogspot.com/2010/04/horlick-doggie-cookie.html  I tried it today & it tasted great! Though the decorating part takes up most of my time, I enjoy every bit of it see how I managed to create cute bear biscuits.


Ingredients:
A
200g Top flour
25g cornflour
25g milk powder
( I added 10g icing sugar to this recipe to prevent the salty taste fr the butter)

B
180g salted butter (room temperature & cut into smaller chunks)
80g Horlicks Powder

Decoration
- enough Chocolate Chips (abt 100g)
- Koko Crunch, Chocolate Rice for decoration

Method:
1) Sift A into a clean medium bowl.
2) Cream B for 3 minutes at low speed. Do not overbeat.
3) Add sifted A and beat for 1 minute to form a dough. (Use your hands to gently mould the dough together)
4) Divide dough into 10g each. Embed 3 chocolate chips into each piece of dough & roll into a ball.
5) Insert 2 pc of Koko Crunch to form ears, chocolate rice as eyes (I used sprinkles), 1 chocolate chip as nose. Repeat & bake in batches.
6) Bake at pre-heated oven of 140 degree C for about 20 minutes (my conventional oven just take 12 min).
7) Cool before storing. (Becareful not to touch the bear's nose as the choc chips has melted). 

Friday, June 18, 2010

Oven Braised Lamb Shoulder with Red Wine Sauce


This is my first attempt in cooking lamb using red wine. I had used Shiraz for this recipe (as this is the only red wine I could find in my house). However, I would prefer a much lighter and sweeter red wine as the Shiraz is quite sour and dry. I also did not have any herbs available when I cook this, so I have to put more black pepper to marinade the lamb.

I would definitely make this dish again to serve with spaghetti. The sauce is just Oozing.... =)

Ingredients:
A
(Rub and mix these ingredients together. Best to marinade overnight or for at least an hour)
- Lamb Shoulder pieces ( I bought about RM 20 of lamb meat with bones)
- Olive oil ( I use Canola Vegetable Oil)
- Sea salt
- Fresh Crushed Black Pepper

B
- Garlic, 1 whole bulb
- 3 Sprigs Rosemary
- 2 Bay Leaves
- Thyme

C
- 2 Red Onions (quartered, I used Bombay Big Red Onions)
- 2 Carrots (peeled & roughly chopped)
- 2 Sticks Celery
- Leek
- 4 Ripe Tomatoes, halved

D
- 400g tin whole tomatoes (can be substitued with 200ml tomato puree or tomato paste)
- 1/2 bottle Red Wine
- 1 cup Stock (Vegetable / Chicken / Beef)

Method:
1) Marinade overnight lamb with ingredients in A.
2) Preheat oven 200 degree C. Take out the marinade lamb to rest in room temperature.
3) Use a sharp knife to make small incisions in the lamb. Poke in B inside the meat.
4) Add all (B) ingredients to tray.
5) Put in remaining garlic & herbs.
6) Pour tinned tomatoes followed by red wine & stock.
7) Cover tray tightly with a layer of foil. (These will prevent losing the steam in the oven)
8) Put in oven, lower temperature to 170 C.
9) Braised around 2 hrs - 4 hrs (depending on the size of your lamb meat). Lamb will be soft, sticky and can easily be separated by a fork.
10) Squeeze garlic out of skin. Serve.

** To shorten cooking time, I had pan fried and browned the marinade lamb pieces before putting on the oven tray.**

Thursday, June 17, 2010

Sweetie Oatmeal Raisin Soft Cookies


This delicious cookies have a soft center and its a much healthier choice to munch on when you feel like a bite. I can't stop licking my fingers when I was blending and mixing the ingredients cause the smell and texture is just oh-so creamy. And whats even better is it uses brown sugar; another "less-guilt" excuses for something sweet.

So, anyone wants a COOKIE?? ^_^

Makes : aprx. 4 dozen
Ingredients:
A
240gm margarine or butter, softened & cut into cubes
1 cup firmly packed brown sugar
1/2 cup castor sugar

B
2 eggs, room temperature
1 tsp vanilla essence

C
1 1/2 cups all purpose flour
1 tsp baking soda
1 tsp cinnamon
1/2 tsp salt (optional)

D
3 cups Quaker Oats (quick or old fashioned, uncooked, unsoaked)
1 cup raisins

Methods:


1) Pre-heat oven to 350 F or 170 degree C.
2) Beat together (A) until creamy. Start with low speed and up to medium speed.
3) Add (B) into the (A) mixture, beat well.
4) Sift & combined all the dry ingredients (C) in a bowl. With a rubber spatula, mix (C) into the mixture. Mix well.
5) Stir in (D). Mix well.
6) Drop in rounded tablespoonfuls onto baking paper lined on oven tray.
(Optional: Add in choc chips or sprinkle at this stage)
7) Bake for 10-12 minutes or until golden brown.
(Cookie is well baked if the centre springs back when lightly pressed by your finger)
8) Cool 1 minute on paper and remove to wire rack.
9) Store in airtight container.

Enjoy!~


Monday, June 14, 2010

Happy Marble Cake


Last Saturday, Mom-in-law told me that my dad-in-law likes the cakes & muffins that I had made in the past few weeks (*_^) ~wink~. He hopes that I'll continue baking some more fresh cakes & cookies so that all of us can have healthier snacks to eat whenever we feel hungry..

Recently, I'm a fan of http://pengskitchen.blogspot.com/ as it has alot of recipes that is interesting and has clear instructions on the baking process.

Today, I made a marble cake using Peng's recipe though I have reduced the amount of butter used and added some chocolate chips on top for a prettier effect.

The texture is just lovely!Moist, soft and not too sweet. My hubby commented that it taste nicer than those marble cake we bought in our local bakery shops (*_^) This cake is really worth trying as it can be cut into quite alot of pieces, ideal as refreshments for parties.

Here goes the recipe:

Ingredients:
A
2 tbsp cocoa powder, sifted
1/4 tsp baking powder
3 tbsp warm water

B
250gm unsalted butter (cut into small cubes) ( I used 225gm Gold Churn Unsalted Butter)
200gm sugar
4 eggs (room temperature)

250gm self-raising flour ( or you can make your own by sifting 2 cups plain flour, 2 1/4 tsp baking powder, 1 tsp salt)

C
1 tbsp condensed milk
1/4 cup water
1/2 tsp vanilla essence
2 tbsp finely chopped mixed peel (optional)
2 tbsp chocolate chip ( optional for garnishing)

Methods:
1) Line base and grease an 8 inch square cake pan. Preheat oven at 160 degree.
2) Dissolve A until smooth. Set aside.
3) Combined C. Set aside.
4) Place butter & sugar in a mixing bowl. Beat at low speed till butter & sugar is evenly combined. Increase speed to medium & beat for 5 minutes or till mixture is pale & fluffy. Do not overbeat ( else butter will melt).
5) Add eggs 1 at a time beating for 1 to 2 min in between each addition. Batter will be light & fluffy.
6) In another bowl, using a balloon wire whisk, fold in half sifted flour & milk mixture (C). Do not beat or stir the mixture. Divide into 2 equal portions.
7) Fold in cocoa mixture (A) into 1 portion. Do not over-mix (Add the mixed peel to other portion)
8) Spoon alternate batters into cake pan. Tap a few times to make consistency. Using a knife swirl batters twice to achieve a marbled effect. (Sprinkle choc chips on top)
9) Bake at 160 degree for 60 -75 min (my conventional oven just used 35 min to bake). Check with a skewer or toothpick and if it comes out clean,it is well-baked. Else, bake for another 10 min. (Cover cake surface loosely with foil at the last 10 min to prevent over browning).
10) Cool cake in pan for 10 min before serving.


Thursday, June 10, 2010

Holiday Baked Yogurt Cake with Choc


I happened to have half tub of yogurt left in my fridge so I made a Yogurt Cake using the yogurt =) My sis-in-law and I had fun in the kitchen and we waited anticipatedly for our very first Yogurt cake to bake.

You can use any flavor of yogurt that u have in your fridge. Mine was original yogurt so it taste a bit bland and I've added chocolate chips and raisin to it. The recipe recommended using a 9 inch bundt pan. I do not own one, so I substitute with two 8 inch cake pan.

The cake turns out very moist and full of flavors as we added an extra egg to it. My father-in-law loves it as it taste more like "old-fashion" cake & my hubby gobbled down slices after slices as it is not too sweet.

The original recipe can be found at http://www.marthastewart.com/. For my version of recipe, I've used up all my yogurt ( about 2 cups plain yogurt).


Ingredients:

1/2 cup softened butter
1 cup brown sugar ( I use castor sugar)
1 tsp vanilla essence
1 egg ( I use 2 eggs)
2 cup all purpose flour
1 tsp baking soda
1/2 tsp baking powder
1 1/4 cup plain yogurt ( I use 2 cups and can be substitued by other flavor)
chocolate chips (optional)
raisins (optional)

Method:
1) Preheat oven to 175 degree. Grease cake pan.
2) Cream butter, sugar and vanilla till light and fluffy.
3) Beat in egg and cream till smooth.
4) In a bowl, sift and combine flour, baking soda and baking powder.
5) Stir in alternately and in small badges of the flour and yogurt to the creamed mixture. Fold in till well-combined.
6) Add in chocolate chips and raisins.
7) Pour batter into pan. Bake for 50 minutes (if you are using bundt pan) OR 15 minutes (if you are using 2 cake pans).
8) Insert skewer to check if done. Remove from oven, cool on rack.
9) Remove cake from pan and dust with some icing sugar.